The post 8 Reasons Why Your Business Needs SharePoint appeared first on Dynamics.
]]>Microsoft SharePoint is a web-distributed application that provides the collaboration and document management services for any size organization. In this article, we explore how SharePoint can be used to improve your business and streamline your processes!
1. Part of rich business product Microsoft 365
SharePoint is a Microsoft product that provides businesses with a platform for collaboration, storage, and document management. SharePoint has many features that can benefit businesses of all sizes, including:
- The ability to create and store documents in a central location.
- The ability to share documents with others in a secure environment.
- The ability to track changes to documents and see who has accessed them.
- The ability to create and manage workflows.
- The ability to integrate with other Microsoft products, such as Office 365.
SharePoint is a versatile platform that can be used for a variety of purposes, such as creating an intranet for your business or storing and sharing documents. If you are not using SharePoint, you are missing out on a powerful tool that can help your business run more efficiently.
2. SharePoint Provides Usability
SharePoint provides a central repository for all your business files, which makes it easy for employees to find the information they need. It also allows you to control who has access to which files, so you can keep sensitive information secure.
SharePoint also makes it easy to create workflows to automate certain business processes. This can save you a lot of time and money in the long run.
Another great benefit of SharePoint is that it can be used to create intranets for businesses. Intranets are private networks that allow employees to share information and collaborate on projects. They can be used to store company policies, procedures, and other important documents.
Overall, SharePoint is a versatile tool that can be used in a variety of ways to improve your business. If you haven’t already started using it, now is the time!
3. SharePoint is Easy to Use
SharePoint is an easy-to-use platform that can be used by businesses of all sizes. It is user-friendly and can be accessed from any device with an internet connection.
SharePoint is a great way to store, share, and manage files and information. It is highly customizable and can be tailored to fit the specific needs of your business.
SharePoint is a cost-effective solution for businesses that need to improve their collaboration and communication. It can help to increase productivity and efficiency levels.
If you are looking for a platform that will make it easy to store, share, and manage files and information, SharePoint is the perfect solution for your business.
4. SharePoint is Cost Effective
SharePoint is a cost-effective way to store, manage, and share information within your organization. SharePoint can be used to create websites, document libraries, lists, and much more.
SharePoint is easy to use and does not require any special training or skills to get started. It is also very scalable and can be customized to fit the specific needs of your business.
SharePoint is a great tool for businesses of all sizes. It can help you save time and money by storing and sharing information in a central location. SharePoint is also very secure and reliable, so you can be sure that your data is safe.
If you are looking for a way to improve your business, SharePoint is a great option. It is cost effective, easy to use, and provides many benefits for businesses of all sizes.
5. SharePoint is Customizable
SharePoint is a highly customizable platform that can be adapted to fit the needs of any business. Whether you need a simple document repository or a complex intranet system, SharePoint can be configured to meet your specific requirements.
SharePoint is also easy to use and manage. Once it is set up, it can be easily maintained by your own staff without the need for expensive IT support.
Additionally, SharePoint is scalable and can grow with your business. As your needs change, SharePoint can be easily expanded to accommodate those changes.
There are many reasons why your business needs SharePoint. Contact us today to learn more about how SharePoint can benefit your organization.
6. SharePoint Allows Employees to Collaborate Effectively
SharePoint is a powerful tool that can help businesses to improve their productivity and efficiency. It allows employees to collaborate effectively, share documents and information, and stay organized.
SharePoint also makes it easier for businesses to keep track of their projects and goals. It can help managers to monitor employee progress and ensure that everyone is on track.
SharePoint is a versatile tool that can be used in a variety of ways. It can be customized to fit the specific needs of your business.
If you are looking for a way to improve your business, SharePoint is a great option. It can help you to increase productivity, boost collaboration, and stay organized.
7. SharePoint Serves as a Public Platform for Your Company’s Content
SharePoint has long been known as a powerful tool for businesses. However, many small businesses have yet to take advantage of its many features. One of the most valuable features of SharePoint is its ability to serve as a public platform for your company’s content.
When you use SharePoint to store and share your company’s content, you can be sure that it is accessible to everyone who needs it. This is especially important for businesses that have remote employees or that need to share information with partners and clients.
SharePoint makes it easy to control who has access to your content. You can set up different permission levels for different users, so that only the people who need to see certain information can access it. This ensures that your content is secure and that only the people who need to see it can view it.
SharePoint also makes it easy to search for information. You can use the built-in search function to find the information you need, or you can create custom searches to narrow down the results. This makes it easy to find the specific information you need, when you need it.
Overall, SharePoint is an incredibly powerful tool that every business should take advantage of.
8. SharePoint Integrates Well with Other Microsoft Products, Such
Microsoft SharePoint is a versatile platform that integrates well with other Microsoft products. This can be a major advantage for businesses that already use Microsoft products and want to streamline their operations.
SharePoint can be used to create company intranets, extranets, and websites. It is also a popular choice for document management and collaboration.
SharePoint is easy to use and has a variety of features that can be customized to fit the needs of your business. It is also scalable, so it can grow with your business.
If you are looking for a comprehensive platform that can help improve your business operations, SharePoint is a good option to consider.
The post 8 Reasons Why Your Business Needs SharePoint appeared first on Dynamics.
]]>The post Sales Automation appeared first on Dynamics.
]]>When I started my business, I worked like a superman. If any project was coming I jumped into it for conversion. But slowly this habit converted into compulsion. This is what happens with most small and medium businesses.
As a business owner I can feel the pain of a small business, no matter how good your sales team is but most deals only get converted when business owners are involved in it. That sets a sales limitation for your organisation.
There is no debate about how important sales is for your business. No sale no business, it’s so straight. But at the same time it is hard to find an ideal salesperson for your business.
But now it is not so hard because technology has reached a level where you can set up the right system and let the team follow it step by step and it’s called Sales Automation.
I am going to reveal 4 strategies which any business needs to set up for a powerful sales team and processes in their business.
Customer Journey –
The first change you need to make in your business is to list down all steps which are involved right from the first step to sale. This is called customer journey in digital terms.
For example in any business once a customer comes on your website and takes interest in product/services. And sharing details with your business, it means that customers are in need.
Once your business acquired customer contact details, standard processes of customer journey are:
- Inquire customer needs.
- Educate them about your solution.
- Suggest right product and services.
- Handle objections till customer no to customer yes.
- Share quotations.
- Do negotiation.
- Close the deal.
Every business has their own type of customer journey which business needs to list and set up a digital platform to track their customer journey and take the right step at the right time
Right Communication Template –
Communication templates are the most effective resource for business. No matter which channel you are using for communication, it’s email or it’s phone call or message.If you are not able to understand customer’s psychology and handle objections properly. Sales will not take place.
To handle it better you need to list down customer questions, emotions related to product and service and script the best possible reply for them using digital templates.
For example – if any customer visited your site and left after looking at some products. Next time you can show the same customer similar products on visits or through automated email.
If customer did not take interest you can drop some good suggested products based on similar customer profile, age, sex, and location.
You can educate customers how these products helped similar customers. which can help customers to make the decision of buying.
If your business communicates with customers on the phone, you can design the right script using the Knowledge Base articles which your salesperson should go to every week to learn better ways to communicate with customers and be able to drive them in the right direction in the sales process.
Customer Experience –
Nowadays Customer Experience is a key factor, right from your website’s landing page to lead generation. Sales process should be seamless. Customers should not face any problem in accessing your products and services. It should be available in one click and at first look best on the customer profile. The best example is Amazon.
Also your business should open for queries and support right from start so you can clear doubts before they become your customers.
The common mistake every business does, is they try to provide more and more information about their business. In this process they forget about what the customer is looking for and this is annoying practice in the digital world.
Because communication is easy, don’t spoil it, try to utilize it in the best possible way. Right information at the right time on customer needs, desires and problems with least efforts by customer.
Right Execution –
Even though you outlized customer journey and documented sales script and automated email template for every step of customer journey and also developed the best UX process for customers. But if you don’t set up an automated process which can execute the complete process in the most effective way you are not going to make it as powerful as it can be.
Setting up the right automation tools and integrating it into a dashboard so sales executives can make fast decisions instead of searching for the right data.
All your automation software should be integrated into one place and give your business the best overview of processes and conversation.
And for best execution, you need the following things :
- Best team with the right communication and decision-making skills which you can set up by setting up roles of sales team members and giving the right script to practice.
- Best available automation tools which can execute steps of automation and give your team the best insights.
Conclusion –
As a business if you’re struggling to generate more sales, you need to set up the right process and automate using the best available software’s and tools because system work people fail.
Using Sales Automation tools like Dynamics 365 Sales you can create a very powerful sales process and customer journey, scripting template and automated emails. Which helps businesses to understand the customer’s stage in the sale process and provide the right information.
The post Sales Automation appeared first on Dynamics.
]]>The post Outlook CRM client installation appeared first on Dynamics.
]]>Before moving forward with Microsoft dynamics CRM outlook client installation, make sure you have outlook installed and configured for access your email account.
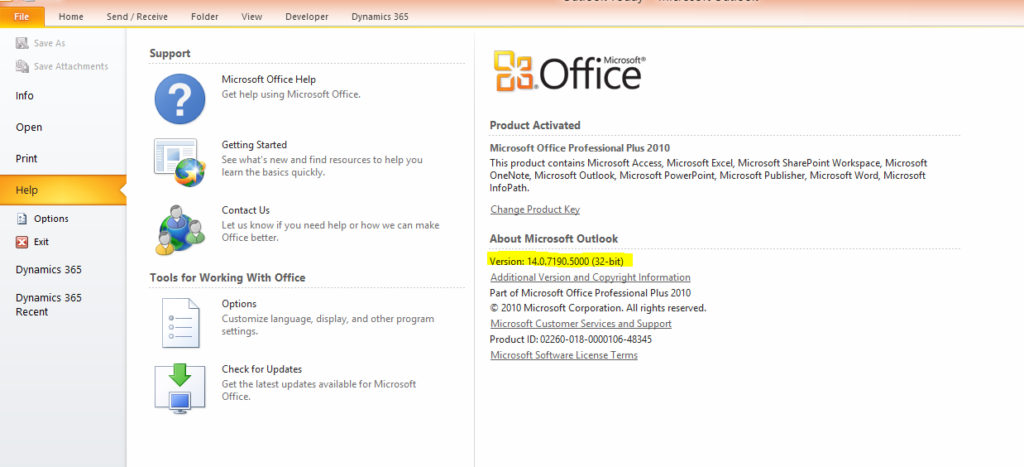
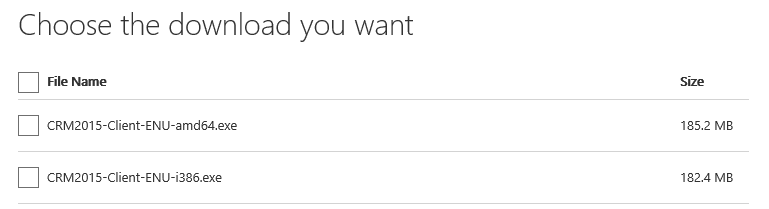
The very first step is to download Microsoft dynamics CRM outlook client and for the same open Dynamics CRM, the yellow notification appears on top for screen to download outlook client. Or you can search on google and download it from Microsoft site. Before download a version of Microsoft dynamics CRM outlook client, you must check your installed outlook version and installation type (32 bit or 64 bit and download CRM client accordingly).
Download client as per outlook version and installation type –
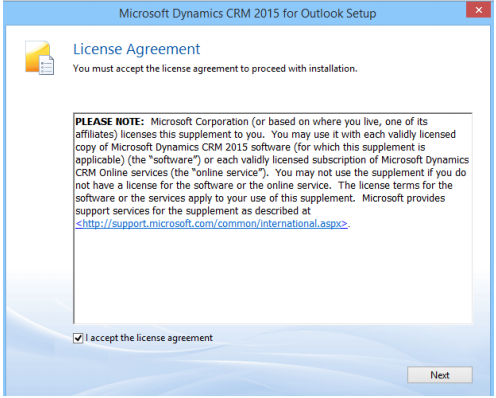
After completing download process for Microsoft Dynamics CRM Out look client installation file (like CRM20XX-ClientOnlineInstaller-ENU.exe ), double click and start installation process. Installation process checks for missing components and install those first before installing Microsoft Dynamics CRM Outlook client. When prompted select accept and click next.
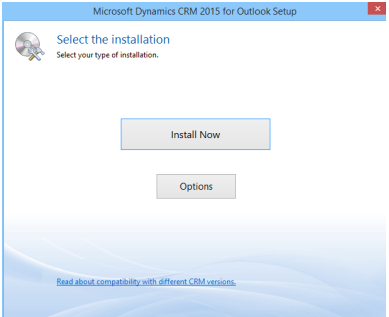
On next screen wait a minute and think do you need offline capability, if yes select options otherwise click Install Now. If you select options, check offline capability fox and then click Install Now.
Rest of install will be similar to Microsoft product installation and you will get to end to finish.
Restart system to take system in effect and then we start on configuration and we can look in next section of my blog.
The post Outlook CRM client installation appeared first on Dynamics.
]]>The post Setting Personal Options in CRM appeared first on Dynamics.
]]>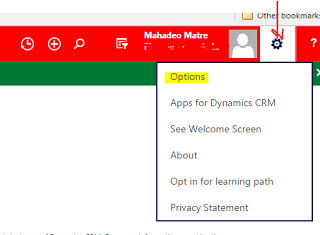
In personal Option page, there are different tabs, which will allow user to set different options:
1. General:
General tab has some basic setting like setting landing page, records per page, time zone, currency etc.
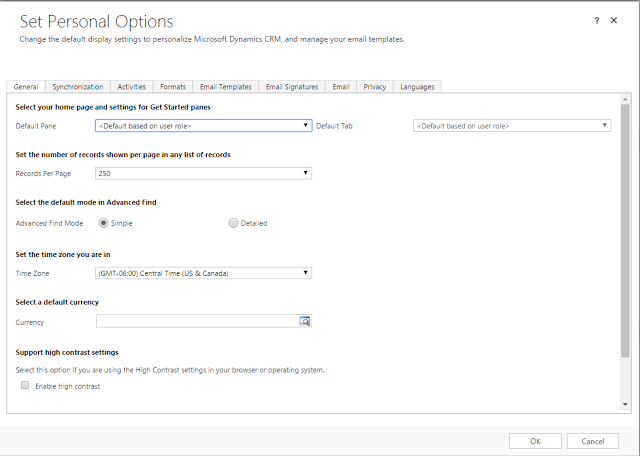
A. Select home page and settings for Get Started panes:
When user logs in CRM system, page which user will see first is the landing page. This will be set using this option. User will specify which default pane and default tab, based on selected default pane and default tab user will be landed when logged in to CRM system.

B. Set the number of records shown per page in any list of records: In CRM views / list how many records wants to see per page. Default option is 50, but user can 25, 50, 75, 100 and 250 records per page.
C. Select the default mode in advanced find: There are two different modes of advanced find- Simple and Detailed, default option selected is Simple. When user opens advanced find from any view/list, which has filters based on default mode set here, advanced find will show detailed filters.
D. Set the time zone: Time zone that user wants to display for his current region.
E. Select a default Currency: MS CRM supports multiple currencies, user can set default currency, so that when creating any records where currency is required, currency will automatically set based on selected value.
F. Support high contrast settings: User can enable high contrast, if user is using high contrast setting for browser or operating system.
G. Set the default country/ region code: Enable country/region code prefixing: Select this check box to enable the default calling code for your region. Country/Region Code Prefix: Enter the value of your region’s calling code in the text box. For example, enter +1 for the United States.
H. View your user information: Link to view details about user. This link will open CRM system user entity form to show current user details.
2. Synchronization: User can set preferences when data is synchronized between MS Dynamics CRM and Outlook or Exchange. User can view / manage online / offline filters, as well as view or manage synchronized filed. Only a system administrator can change the synchronizing fields.
3. Activities: User can set default calendar view and work hours in this tab.
4. Formats: User can set number, currency, time, date formats from this page.
The post Setting Personal Options in CRM appeared first on Dynamics.
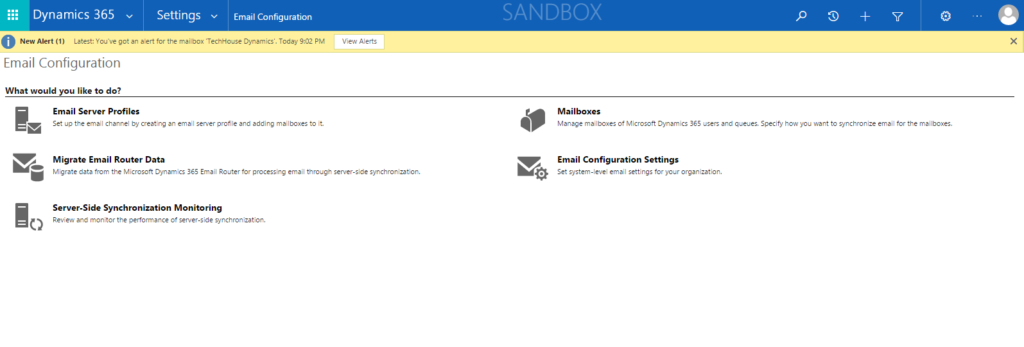
]]>The post Setup – Email Configuration Server Side Synchronizatoin appeared first on Dynamics.
]]>Configuring Server-side Synchronization
- To configure use following steps:Navigate to Settings >> Email configuration >> Select a Server Side Profiles to create a profile. Then select Email Server Profiles
- Click New button to create new server profile and select exchange. Based on your email server you can select any of there.
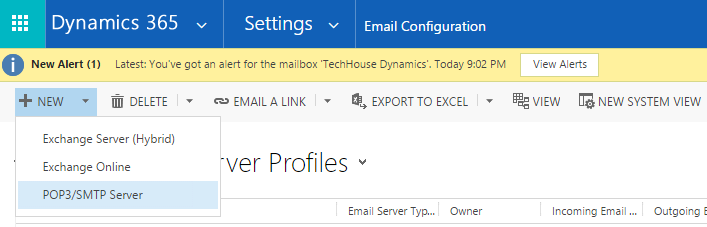
- In most of case Exchange Online server is used with CRM. I selected that.

- To Activate data encryption go to Navigate >> Data Encryption and select data encryption option.
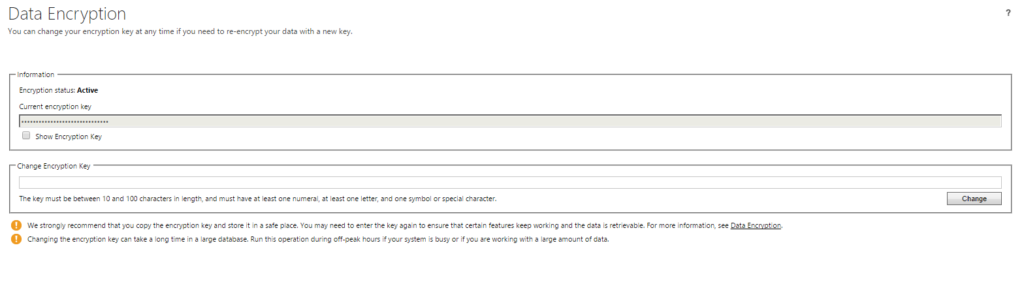
- Click Activate to enable data encryption. The new server profile page will opens, allow you to enter information for Exchange server. If you are using Dynamics CRM without any secrure socket layer. You will get error message which privent you to setup username and password. You can change authentication to integrated windows authentication or change AllowCrenditalsEntityViaNonSecureChannels in database.
- After providing input values like Name, save it. Now Test and Enable Mainlbox button appears in ribbon and it set as default.
Now it is in ready state to specify credentials for Exchange server. You can select any of these options form Authenticate option set.
- Credentials Specified by User or Queue – As per name if you want to use credentials by user or queue, select this option.
- Credentials Specified in Email server – To use credentials specified in email user, select this one. But one important point needs to care in this case is credentials must have impersonation rights on Exchange.
- Integrated Windows Authentication – This is same as CRM asynchronous service is configured with. And only applicable in case of Exchange and SMTP servers.
- Without Credentials – This is not a valid option when working with Exchange server.
Now you can setup mail box. Navigate to Mailboxes >> Active Mailboxes. By default you can see all created user in CRM system.

Select Mailbox which we need to update. By default, Incoming Emails, Outgoing Emails and Appointment, Contacts, and Tasks fields are set to Microsoft Dynamics CRM for Outlook.
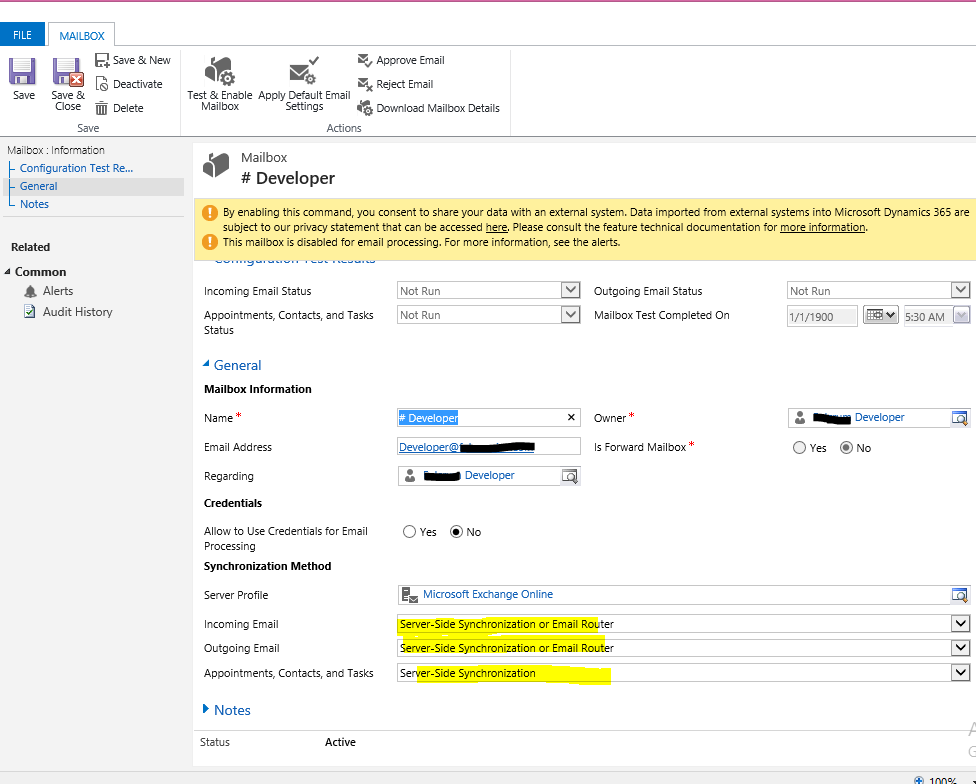
- Change settings for the Incoming Emails and Outgoing Emails, and Appointment, Contacts, Tasks fields to Service Side Synchronization or Email Router. Because you will select server side synchronization, you are prompted to specify credentials. If you select CRM for Outlook or Integrated Windows Authentication, no credentials required.
- Provide credentials and save. And click on Test and Enable mailbox for testing.
The post Setup – Email Configuration Server Side Synchronizatoin appeared first on Dynamics.
]]>The post Microsoft Dynamics 365 CRM reports appeared first on Dynamics.
]]>Creating custom reports in Dynamics CRM:
Step 1: Go to settings -> Reports.
Step 2: To create a new Report click on New.
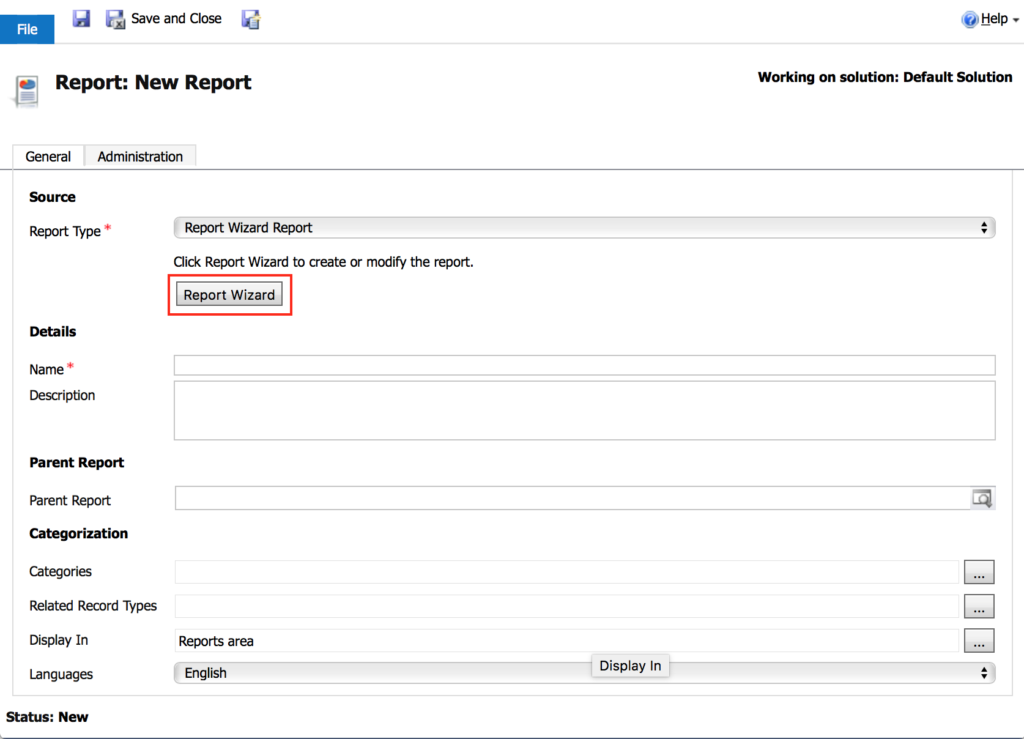
Step 3: Click on Report Wizard.
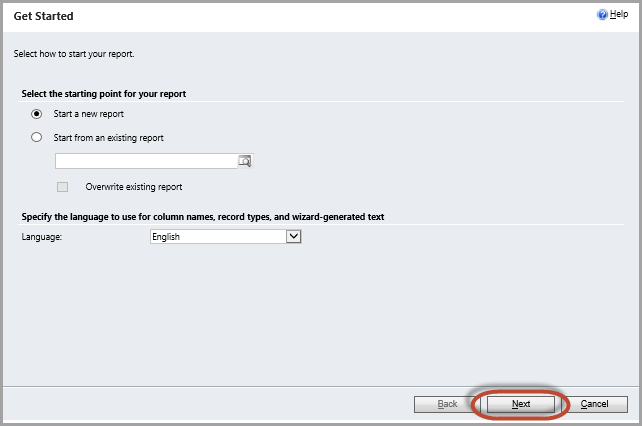
Step 4: Fill the fields and click Next.
Step 5: Report Properties wizard opens. Enter name for report and the appropriate entities to report on. Select Next.
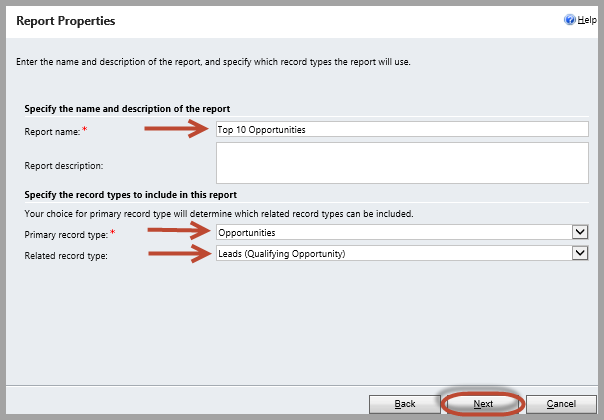
Step 5: Report Properties wizard opens. Enter name for report and the appropriate entities to report on. Select Next.

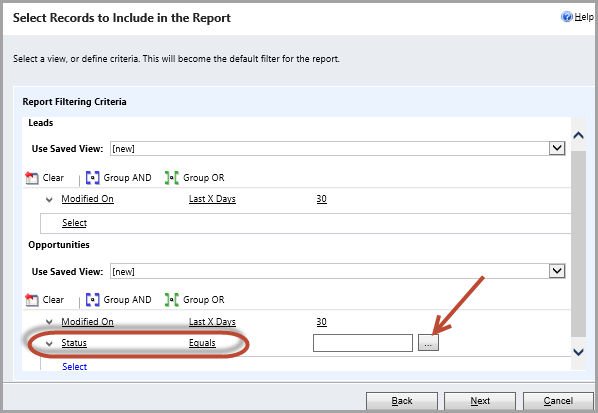
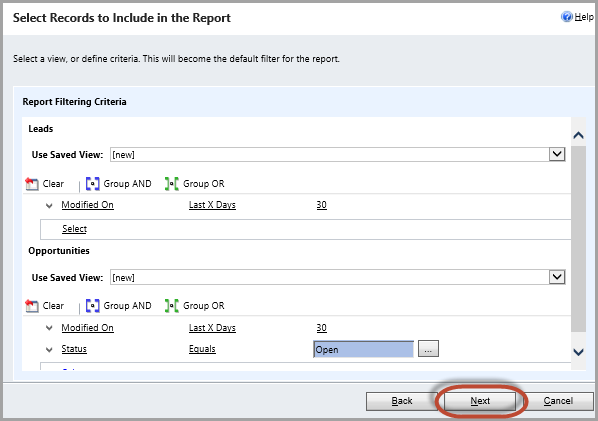
Step 6: Select filters for the data presented in the report.
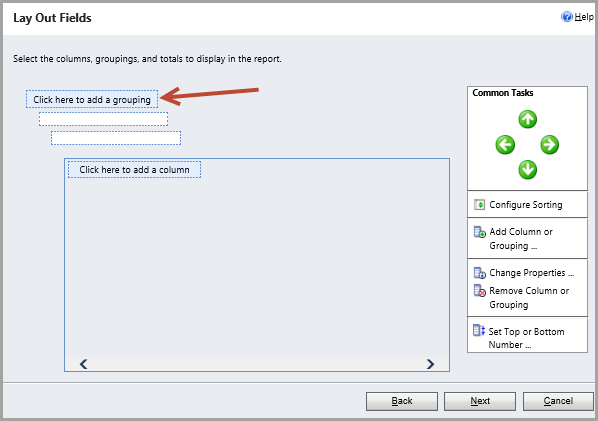
Step 7: Design the layout of report.
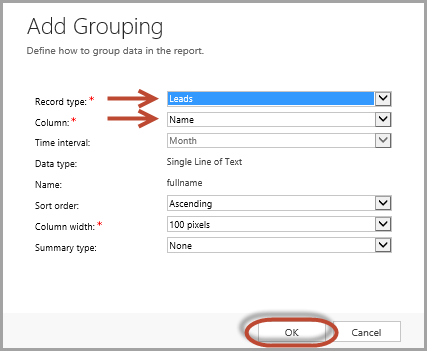
Step 8: Select the record type and the column for the data to have grouped in the report and select OK.
Step 9: Repeat step 7 for additional columns until all the data is in the report. In the Layout Fields screen, click Next.
Step 10: Choose how to format report. Choose desired format—Table only or Chart and table—and select Next.
Step 11: Review the summary of report and select Next.
Step 12: Run the report.
The post Microsoft Dynamics 365 CRM reports appeared first on Dynamics.
]]>The post CRM Analytics Charts appeared first on Dynamics.
]]>System chart:
System charts in Dynamics 365 Customer Engagement are organization-owned charts and can’t be assigned or shared.
1. Make sure the System Administrator security role or equivalent permissions in Microsoft Dynamics 365 are assigned.
2. Go to Settings > Customizations.
3. Choose Customize the System.
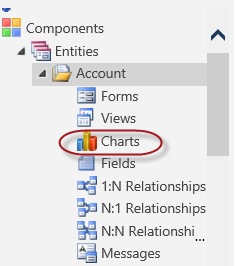
4. To create or edit a system chart, choose Components > Entities.
5. Expand the name of the entity, choose Charts, and then on the Actions toolbar, choose New.
OR
To edit a chart, choose More Actions, and then choose Edit.
6. Select a view to use for chart preview.
7. Specify the type of chart, and how the data is displayed in the chart.
- Choose the chart name to edit it.
- Select fields for the series and category axes.
- Add a description to identify the purpose of the chart.
8. Choose Save.
User chart:
Create a chart:
1. Go to work area.
2. Open the chart designer:
3. Define the properties of the chart.
4. To specify a different name for the chart, choose the chart name to edit it.
5. To save the chart, in the chart designer, choose Save.
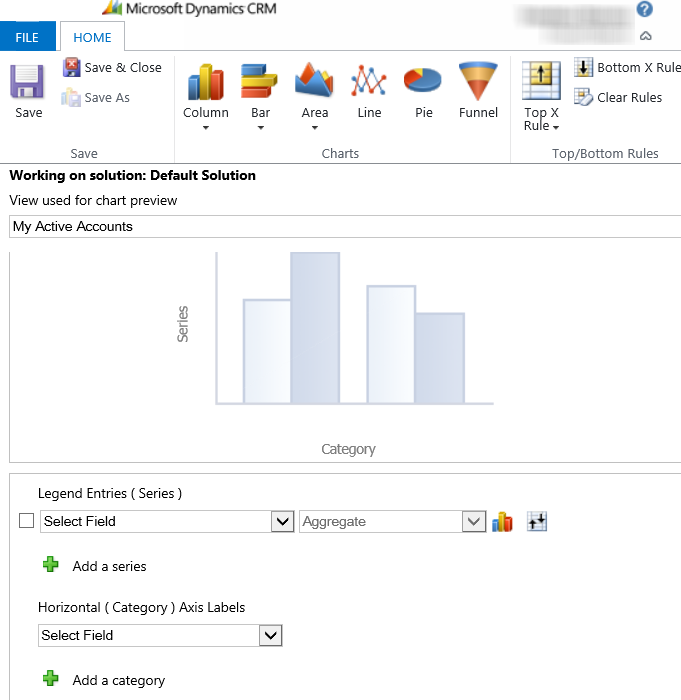
Specify what to display on the chart:
1. In the first drop-down box under Legend Entries (Series), select a field to display on the series axis.
2. In the Aggregate drop-down box, choose the option by which the field is to be grouped that was selected in Legend Entries (Series).
3. To create a chart with multiple series, choose the Add a series icon add_series, select another field to display on the series axis, and then select an aggregate option for that series.
4. To change the chart type for a series, select the series, choose the Current chart type icon for that series, and then select a chart type.
5. To stack items in a chart, choose the chart type, and then choose Stacked or 100% Stacked. It is possible to stack items only in a bar, column, or an area chart.
6. To display only top items on the chart, choose the Top/Bottom Rules icon > Top X Rule icon, > Top 3 or Top 5, or Custom to specify a different number.
7. From the list under Horizontal (Category), select the field to display on the category axis.
8. To create a comparison chart with multiple categories, choose the Add a category icon add_series, and then select another field to display on the category axis.
9. For fields that are of the datetime type, choose the option by which the field is to be grouped that was selected as the category.
Edit a chart:
1. Go to work area.
2. Open the chart designer:
3. Modify the properties of the chart.
The post CRM Analytics Charts appeared first on Dynamics.
]]>The post Fetch Based Report appeared first on Dynamics.
]]>Sample fetch XML to retrieve accounts –
<fetch version=”1.0″ output-format=”xml-platform” mapping=”logical” distinct=”false”>
<entity name=”account”>
<attribute name=”name”/>
<attribute name=”primarycontactid”/>
<attribute name=”telephone1″/>
<attribute name=”accountid”/>
<order attribute=”name” descending=”false”/>
</entity>
</fetch>
This is simple example but it also supports complex queries. Some of examples you can check here –
Easy and best way to create fetch example query is advance filter in dynamics CRM. Advance filter provides you visual dashboard to create and download fetch XML queries as below.

It takes you to next page where you can compose fetch query and download it.

Join fetch query example listed below to retrieve data from contact and account entities-
<fetch version=”1.0″ output-format=”xml-platform” mapping=”logical” distinct=”true”>
<entity name=”account”>
<attribute name=”name”/>
<attribute name=”primarycontactid”/>
<attribute name=”telephone1″/>
<attribute name=”accountid”/>
<order attribute=”name” descending=”false”/>
<link-entity name=”contact” from=”parentcustomerid” to=”accountid” alias=”ab”>
<filter type=”and”>
<condition attribute=”parentcustomeridname” operator=”like” value=”a%”/>
</filter>
</link-entity>
</entity>
</fetch>
Fetch Xml queries get translated into C# using fetch express and entity collection holder. To create fetch xml based reports these components required, we move forward.
- Microsoft Visual studio 2010 or 2012 (download https://www.microsoft.com/en-in/download/details.aspx?id=36020)
- Business Intelligence Development Studio or Sql server Data tool (download https://www.microsoft.com/en-in/download/details.aspx?id=36843)
- Microsoft Dynamics CRM 2016 Reporting Authoring Extension (download https://www.microsoft.com/en-us/download/details.aspx?id=50375).
Once your development environment is ready with all these components, open visual studio and select
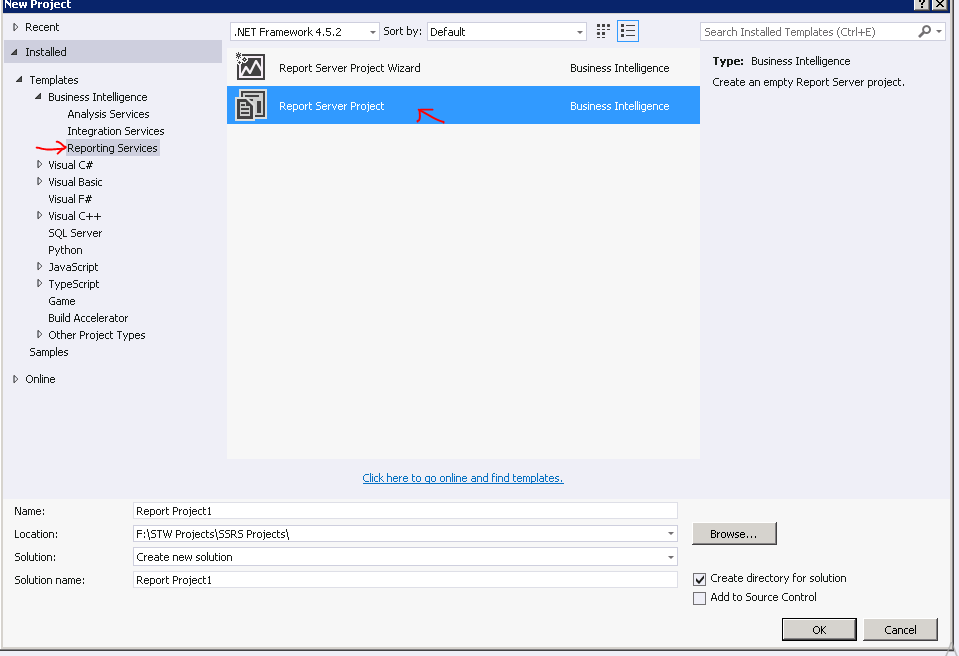
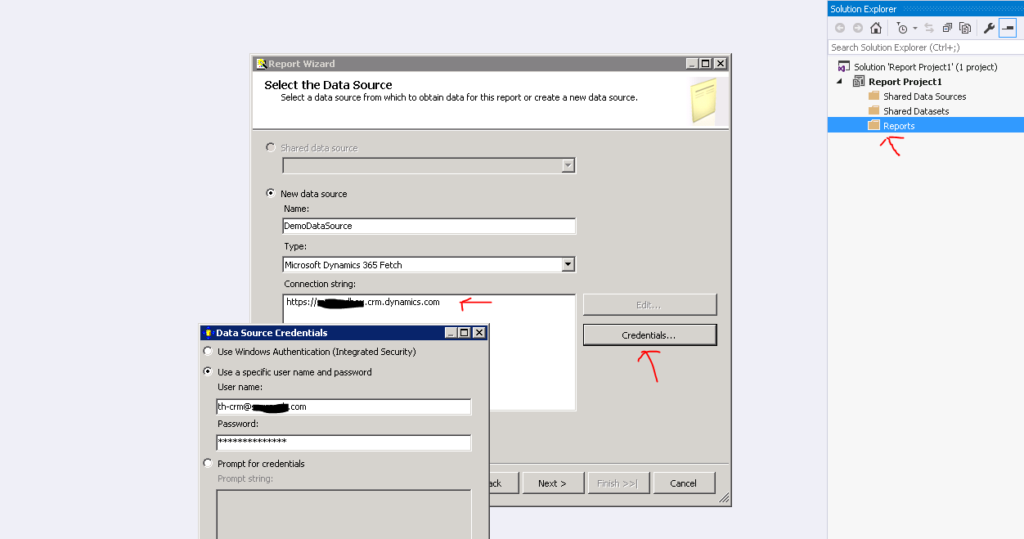
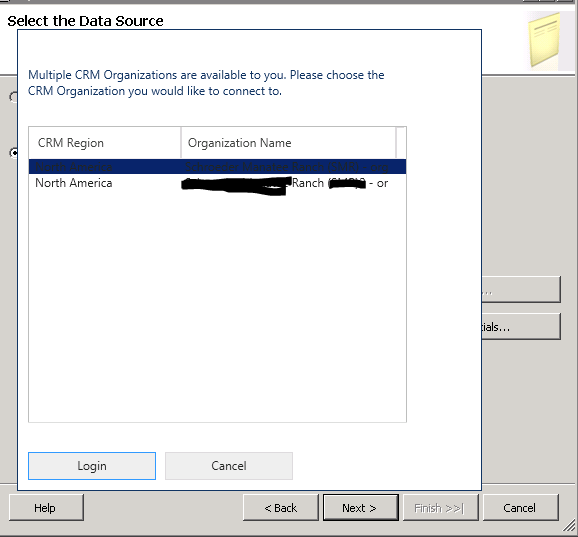
Right click on report folder and select add new report. It opens report wizard. Type new data source name and then select Microsoft Dynamics 365 Fetch in type dropdown. Put Dynamics CRM URL and provide credentials and click Next button to select organization and move next.
Wizard next step is to specify query to compose required data for report and click next.
Click Next button and create report page. Modify reports as per need and save it. You can check report preview using preview button.
To deploy created reports login in Dynamics CRM and open reports sections under Tools top navigation. Select new report and in report type use select existing file.
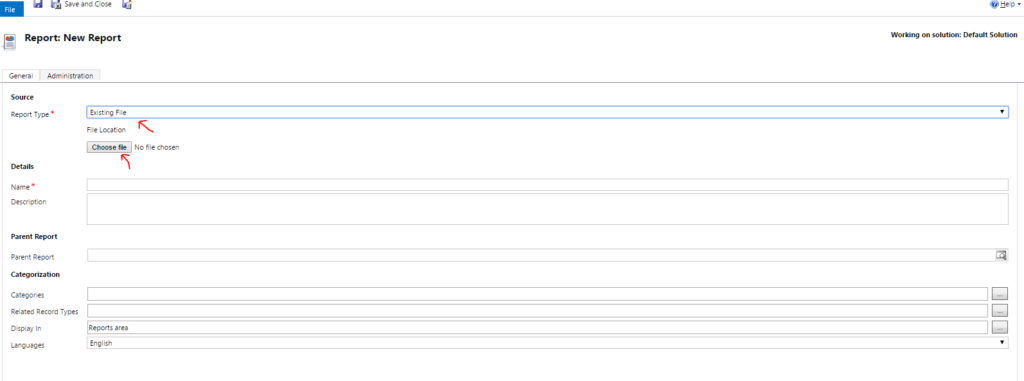
Once report is uploaded you can run after select report from reports list and run report.
The post Fetch Based Report appeared first on Dynamics.
]]>The post Knowledge Management appeared first on Dynamics.
]]>Dynamics 365 supports two knowledge management solutions:
A. Native Dynamics 365 knowledge management: It is available for both Dynamics 365 (online) and Dynamics 365 on-premises users. For Microsoft Dynamics 365 (online) organizations, the native Dynamics 365 knowledge solution is only available if you’ve updated to CRM Online 2016 Update. For on-premises organizations, this feature is only available if you’ve upgraded to CRM 2016.
B. Parature knowledgebase: It is available only for Dynamics 365 (online) users. This feature was introduced in CRM Online 2015 Update 1.
After knowledge management is set up, users will be able to:
- Search for relevant KB articles in Parature right from Microsoft Dynamics 365 as they’re working on a record.
- See the content of the KB article inline, including images and videos.
- Give timely and consistent information to customers when working on their cases by using actions like opening the article and sharing the information or emailing the article link to customers.
Set up knowledge management:
Step 1: Make sure that user has the System Administrator or System Customizer security role or equivalent permissions. Also the user should be the tenant administrator of Microsoft Office 365.
Step 2: Go to Settings > Service Management.
Step 3: Under Knowledge Base Management, click Embedded Knowledge Search.
Step 4: In the Knowledge Base Management Settings wizard, in Record Types, select the record types to turn on knowledge management for. The list will include all entities that are available for an N: N relationship. Knowledge management is enabled for case entity by default.
Step 5: Under Knowledge Source, in the Knowledge Solution field, select between the Dynamics 365 native knowledge solution and Parature knowledgebase.
Step 6: If user is using Native Dynamics 365 knowledge solution, in the Support Portal Connection section, enter the following:
- Use an external portal: It is possible to integrate an external portal for publishing knowledge articles. If given organization uses one, select this check box.
- URL Format: Type the portal URL that will be used to create external (public-facing) portal links for knowledge articles, which the service agents can share with the customers. The external URL is created in the following format: http://<support portal URL>/kb/ {kbnum}
The placeholder “{kbnum}” is replaced by an actual knowledge article number.
Step 7: If user is using the Parature knowledgebase, in Parature Connection Details, enter the following:
- Parature Instance: Select the Parature instance to connect to. The drop-down list by default shows the instance present in users Microsoft Office 365 subscription.
- Parature URL: This is automatically filled and shows the URL of the selected Parature instance in the tenant.
- Account ID: This is automatically filled and shows the ID of the account as it is set up in Parature for the selected Parature instance.
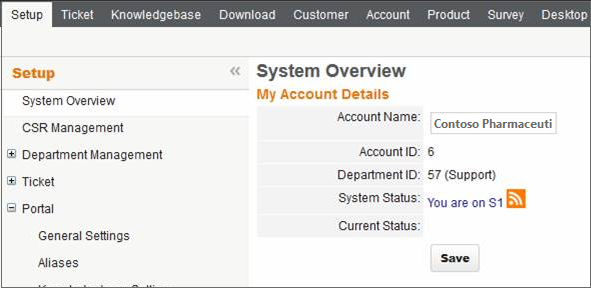
- Parature Department ID: Specify the department ID for the selected Parature instance. Every department in an organization can have their own knowledge base. So you must specify the ID of the department you want to connect to. It is possible to connect to only one department at a time. To find the department ID, sign in to Parature, and on the Setup tab, click System Overview.
- Support Portal URL: Type the support portal URL that will be used to create external (public-facing) portal links for KB articles, which the service agents can share with the customers. Parature offers a customer-facing support portal that your customers can use to access your knowledge base articles or download content. To find the support portal URL, sign in to the Parature Service Desk, and on the Setup tab, click Portal > Aliases.
The external URL is created in the following format:
<Support Portal URL>/link/portal/<account id>/<department id>/Article/<Article id>
Step 8: Click Next.
Step 9: If details are specified correctly, the page shows the connection details for Dynamics 365 or Parature. Click Finish to complete the setup.
The post Knowledge Management appeared first on Dynamics.
]]>The post Customer Service appeared first on Dynamics.
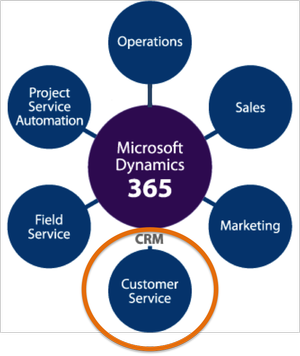
]]>Microsoft Dynamics 365 for Customer Service is Microsoft’s customer service offering for large and enterprise-class companies. It’s one of several “Apps” in the newly branded Dynamics 365 application suite. Microsoft licenses all Dynamics 365 Apps for either cloud or on-premise deployment.
Terminologies:
- Service: A type of work, such as a maintenance activity, performed for a customer by one or more resources. Services are schedulable activities.
- Resource: Users, facilities or equipment, or teams that can be scheduled and have work schedules.
- Resource groups: Groups of resources that can be scheduled interchangeably.
- Work hours: The hours that a resource is available for scheduling.
- Site: The location of a resource. Use sites to make sure that the customer and the resource are in the same location.
- Service activity: A schedulable appointment to provide a service to a customer. A service activity uses one or more resources to perform a service at a specific time and place. An appointment is a schedulable activity that does not use services and does not require a resource with work hours.
- Scheduling rule: A set of criteria that specifies which personnel, equipment, facilities, or resource groups are required to perform a service, or how to select these resources, based on parameters like quantity and capacity.
Select resources for service:
When user adds a resource to a service, he should create a selection rule to determine how resources will be selected for service activities.
User can create a simple rule that selects resources from a list, or a compound rule that selects a combination of resources, or a complex tree of selection rules that selects from groups of equivalent resources.
Add resources to existing services:
User can add as many resources as he wants, and they can be a mix of individual users, facilities, equipment, and teams.
Use resource groups:
Resource groups are used to group users, facilities, and equipment as part of the selection rules for a service. It is possible to add resources to a resource group from the service record.
Test your service:
Before starting using a service, test it. Create a service activity with no criteria other than the service. Use the results to confirm that the service is selecting correctly. The message bar will also display any problems with the search.
- Click Dynamics 365 > Service > Service Calendar.
- Click Service Activity. This bypasses the scheduling form.
- Select the service to test.
- Click Find Available Times.
The post Customer Service appeared first on Dynamics.
]]>