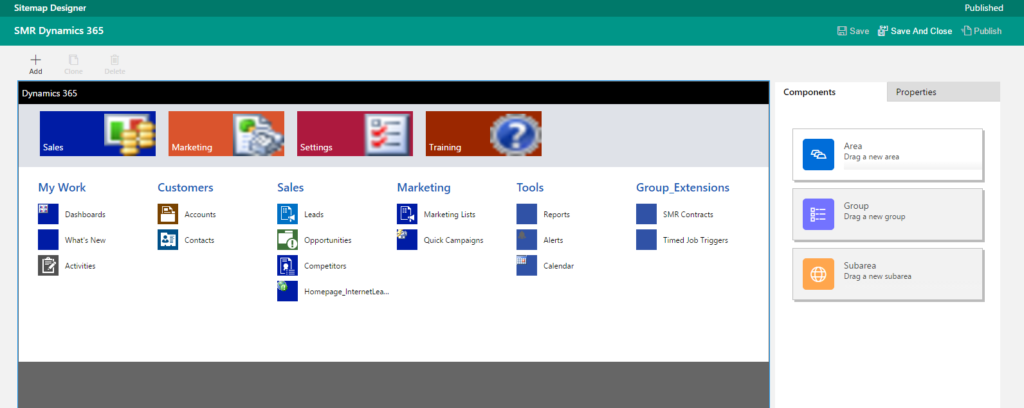
Customization Menu using Site Map – Top navigation in Microsoft Dynamics CRM is described by Site Map. To edit site map, first export site map and make modification and again upload in CRM. It’s a best practice to create new solution in Microsoft Dynamics CRM with site map client extension. Open Site Map extension by direct click on site map using solution. It opens for edit in Site Map designer.
Edit site map Using Dynamics CRM site Map Designer:
Open solution select site map and double click, it takes you on site map designer page –

Edit site map by Export and Import –
Exporting the Site Map
- In Top navigation select Settings, click Customization, and then click Export Customizations.
- In the View drop-down, select Client Extensions.
- In the list, select Site Map.
- Click Export Selected Customizations and then click OK and click Save and save the customizations.zip.
- Click Close.
Once you edited the Site Map elements in the customizations.xml file, you need import the modified customizations.xml file to apply your changes.
Importing the Site Map
- Again in top navigation select Settings, click Customization, and then click Import Customizations.
- Click Browse to locate an XML file or a compressed (.zip) file that contains customizations and settings exported from Microsoft Dynamics CRM.
- Double-click the file or select the file, and then click Open.
- Click Upload.
In case error occur a dialog box will display error messages.
You must know about site map node when you trying to edit sitemap using export import process. Site Map has root entry node with same name as Site Map. Sub nodes are categorized as follow –
Area Node:
Area node is nothing basically top navigation nodes like Sale, Service, Marketing, Setting etc. Area node XML is similar to given element and attributes.
<Area Id=”CS” ResourceId=”Area_Service” Icon=”/_imgs/services_24x24.gif”
DescriptionResourceId=”Customer_Service_Description”>
<Group Id=”CS”>
Area node attributes are described as bellow –
- Id: Unique identifier for each area node.
- ResourceId: Resource Identifier for language.
- Show Group: It’s only required when area node has more than one group.
- Icon – This contains URL of icon related to area node.
- DescriptionResourceId: This is for internal use only.
- IntroducdVersion- This is mainly related to version of CRM, like 7.0.0.0 for CRM 2015 and 8.0.0.0 for CRM 2016.
Group Node:
Group node mainly used for group sub areas node under area node. You can put title for group area. Like My Work, My service etc.
<Group Id="CS">
<Titles>
<Title LCID="1033" Title="Group 1"/>
</Titles>
<subarea node goes here />
</Group>
SubArea Node:
A SubArea nodes use to provide link to specific entity or page. You can see example of Sub Area nodeXML –
<SubArea Id="nav_apptbook" ResourceId="Homepage_AppointmentBook"
DescriptionResourceId="AppointmentBook_SubArea_Description"
Icon="/_imgs/ico_18_servicecal.gif" Url="/sm/home_apptbook.aspx"
AvailableOffline="false">
<Privilege Entity="activitypointer" Privilege="Read" />
<Privilege Entity="service" Privilege="Read" />
</SubArea>
<SubArea Id="nav_cases" Entity="incident"
DescriptionResourceId="Cases_SubArea_Description" Url="/CS/home_cases.aspx" />
<SubArea Id="nav_accts" Entity="account" DescriptionResourceId="Account_SubArea_Description" />
<SubArea Id="nav_contacts" Entity="contact" DescriptionResourceId="Contact_SubArea_Description" />
Finally a area node displays like -
<Area Id="CS" ResourceId="Area_Service" Icon="/_imgs/services_24x24.gif" ShowGroups="true"
DescriptionResourceId="Customer_Service_Description">
<Group Id="CS">
<Titles>
<Title LCID="1033" Title="Group 1"/>
</Titles>
<SubArea Id="nav_apptbook" ResourceId="Homepage_AppointmentBook"
DescriptionResourceId="AppointmentBook_SubArea_Description"
Icon="/_imgs/ico_18_servicecal.gif" Url="/sm/home_apptbook.aspx"
AvailableOffline="false">
<Privilege Entity="activitypointer" Privilege="Read" />
<Privilege Entity="service" Privilege="Read" />
</SubArea>
<SubArea Id="nav_cases" Entity="incident"
DescriptionResourceId="Cases_SubArea_Description" Url="/CS/home_cases.aspx" />
<SubArea Id="nav_accts" Entity="account" DescriptionResourceId="Account_SubArea_Description" />
<SubArea Id="nav_contacts" Entity="contact" DescriptionResourceId="Contact_SubArea_Description" />
</Group>
<Group Id="CS_New_Group">
<Titles>
<Title LCID="1033" Title="Group 2"/>
</Titles>
<SubArea Id="nav_managekb" ResourceId="Homepage_KBManager"
DescriptionResourceId="KBManager_SubArea_Description" Icon="/_imgs/ico_18_126.gif"
Url="/cs/home_managekb.aspx" AvailableOffline="false">
<Privilege Entity="kbarticle" Privilege="Read,Write,Create" />
</SubArea>
<SubArea Id="nav_contracts" Entity="contract"
DescriptionResourceId="Contract_SubArea_Description" />
<SubArea Id="nav_products" Entity="product" DescriptionResourceId="Product_SubArea_Description" />
<SubArea Id="nav_services" Entity="service" DescriptionResourceId="Service_SubArea_Description" />
</Group>
</Area>
Keep in mind, you need to specify a unique value for Id attribute for areas, groups and sub areas which help you to edit site map in Dynamics CRM site map designer.

